Hexo SEO 最有用的教程

前言

备案、内容符合社会主义核心价值观的容易被百度收录,技术文章只需要看谷歌和必应即可。不同于私域流量,我们的网站流量更多的来自于互联网的 🔍 搜索引擎,动态博客有很多成熟且简单的 SEO 优化方式,而像 Hexo 这样的静态博客毕竟还是相对小众,因此本文主要介绍在刚搭建好自己的 Hexo 博客后需要做的一些 SEO 优化步骤及注意事项。

各平台收录查询

百度收录weilining.github.io查询

谷歌收录weilining.github.io查询

必应收录weilining.github.io查询

360收录weilining.github.io查询

yandex收录weilining.github.io查询

搜狗收录weilining.github.io查询

各平台 Robots.txt 测试工具

百度
必应
谷歌

修改网站信息

使用文本编辑器打开 Hexo 的_config.yml配置文件,找到 # Site 部分,根据实际修改网站信息

1
2
3
4
5
6
7
8
# Site
title: '网站标题'
subtitle: '网站副标题'
description: "网站描述"
keywords: "网站关键词"
author: '作者名称'
language: '网站语言'
timezone: '网站时区'

各项参数按照 Hexo 官方文档 说明如下:

参数 描述
title 网站标题
subtitle 网站副标题
description 网站描述
keywords 网站的关键词,支持多个关键词
author 您的名字
language 网站使用的语言
timezone 网站时区, 参考 时区列表 进行设置

下面是一个网站信息写法示例:

1
2
3
4
5
6
7
title: Ln's Blog #网站标题
subtitle: "有朋自远方来,不亦乐乎" #网站副标题
description: "算法、技术" #网站描述
keywords: ACM,开发者,程序猿,极客,编程,代码,开源,IT网站,Developer,Programmer,Coder,Geek,互联网一切折腾 #网站关键词
author: Lining Wei #作者
language: zh-CN
timezone: "Asia/ShangHai"

优化永久链接

修改 Hexo 的配置文件的 permalink: 字段,比如:

1
permalink: :title.html

添加网站地图

常用的生成网站地图插件是 Hexo 官方的 hexo-generator-sitemap,推荐使用对 SEO 更加友好的 hexo-generator-seo-friendly-sitemap 插件来生成网站地图:

1
2
3
4
# 在Hexo根目录打开Terminal/Bash安装插件
$ npm install hexo-generator-seo-friendly-sitemap --save
# 或者使用yarn
$ yarn add hexo-generator-seo-friendly-sitemap

在 Hexo 配置文件里加入插件配置项:

1
2
3
4
sitemap:
path: sitemap.xml
tag: false
category: false
参数 说明
path 索引网站地图路径,默认 sitemap.xml
tag 网站地图是否排除标签页面
category 网站地图是否排除分类页面

建议:设置 tag: falsecategory: false 将标签页面和分类页面排除在网站地图外

以我的为例,按照上面配置后本站的网站地图即为:

  • 索引网站地图:https://www.dejavu.moe/sitemap.xml

    img

  • 文章网站地图:https://www.dejavu.moe/post-sitemap.xml

    img

  • 页面网站地图:https://www.dejavu.moe/page-sitemap.xml

    img

😃 将网站地图提交到 谷歌百度必应 等站长平台后台,请注意:

网站地图类型 特殊说明
sitemap.xml 百度不支持
post-sitemap.xml 都支持
page-sitemap.xml 都支持

添加 robots.txt

Robots.txt 是存放在网站根目录下的一个纯文本文件,它可以指定搜索引擎蜘蛛只抓取指定的内容,或者是禁止搜索引擎蜘蛛抓取网站的部分或全部内容,在线生成 robots.txt :

  • ChinaZ 在线生成 robots.txt
  • W3CSchool CN 在线生成 robots.txt

然后复制生成的 robots.txt 文件内容,在 Hexo 的 source 目录下新建 robots.txt 文件写入即可,站点部署后使用站长工具校验更新下 robots.txt 即可

nofollow 标签

我们使用 Hexo 官方插件 hexo-filter-nofollow 来给站外链接添加 rel="external nofollow noreferrer" 属性,从而降低 不安全搜索引擎印象不佳 的外链对网站 SEO 的影响,安装插件:

1
2
3
4
# 在Hexo目录打开Terminal/Bash
$ npm install hexo-filter-nofollow --save
# 或者使用yarn
$ yarn add hexo-filter-nofollow

在 Hexo 的配置文件中增加插件配置项:

1
2
3
4
5
6
nofollow:
enable: true #true/false 启用/关闭插件
field: site #site/post 处理全站/仅文章链接
exclude: #排除域名,同的子域名视为不同的域名
- 'exclude1.com'
- 'exclude2.com'

主动推送链接

hexo-submit-urls-to-search-engine 是一个 Hexo 插件,在每次运行 hexo deploy 命令后会主动推送网站更新链接到 谷歌百度必应 站长平台,从而加快搜索引擎收录速度

安装插件

在 Hexo 根目录打开 Terminal/Bash:

1
2
3
$ npm install --save hexo-submit-urls-to-search-engine --save
# 或者使用yarn
$ yarn add hexo-submit-urls-to-search-engine

获取站长平台Token

⚓ 确保在 谷歌百度必应 等站长平台已经添加了你的网站

百度

进入网站管理,按下图所示找到资源提交接口的 Token 并记录备用

img

必应

进入网站管理,点击右上角 ⚙ 设置,查看 API 密钥 并记录备用

img

谷歌

😅 得益于中国大陆互联网的境况,此步骤你可能还需要合适的代理软件

打开 Google Indexing API 的官方文档可以看到 使用 Indexing API 的前提条件,按照该文档完成以下步骤:

  • 为客户端创建一个项目
  • 创建服务账号

注意在 创建服务账号 时以 json 格式保存密钥,点击 创建 会自动下载密钥文件,请妥善保存后面会用到

img

点击左侧 服务账号,有个 服务帐号电子邮件地址 ,复制并记录备用

img

进入 Google Search Console——管理用户和权限 后台,按照图示步骤添加用户,电子邮件地址为上一步记录的 服务帐号电子邮件地址

img

在进入 Google Search Console——旧版网站,点进你添加资源的网站,在 已验证的拥有者 下面的 电子邮件 地址中点击 添加所有者,同样添加上一步的 服务帐号电子邮件地址 并继续

img

插件配置

编辑 Hexo 的配置文件,添加 hexo-submit-urls-to-search-engine 插件的配置项,以 的配置文件为例(部分数据已脱敏)

1
2
3
4
5
6
7
8
9
10
11
12
13
14
15
16
17
18
19
# auto-push-urls-to-search-engine
hexo_submit_urls_to_search_engine:
submit_condition: count #链接被提交的条件,可选值:count | period 现仅支持count
count: 100 # 提交最新的链接个数
period: 1000 # 提交修改时间在 1000 秒内的链接
google: 1 # 是否向Google提交(0:否;1:是)
bing: 1 # 是否向bing提交(0:否;1:是)
baidu: 1 # 是否向baidu提交(0:否;1:是)
txt_path: submit_urls.txt ## 文本文档名, 需要推送的链接会保存在此文本文档里
baidu_host: https://www.dejavu.moe ## 在百度站长平台中注册的域名
baidu_token: xxxxxxxxxxx ## 请注意这是您的秘钥, 所以请不要把它直接发布在公众仓库里!
bing_host: https://www.dejavu.moe ## 在bing站长平台中注册的域名
bing_token: xxxxxxxxxxxxxxxxx ## 请注意这是您的秘钥, 所以请不要把它直接发布在公众仓库里!
google_host: https://www.dejavu.moe ## 在google站长平台中注册的域名
google_proxy: http://127.0.0.1:7890 # 向谷歌提交网址所使用的系统 http 代理,填 0 不使用,以Clash为例
google_key_file: genial-xxxxxx-xxxxxx-xxxxxxxxx.json #Google服务项目的json文件名全称,放于网站根目录(与hexo _config.yml文件位置相同),请不要把json文件内容直接发布在公众仓库里!
replace: 0 # 是否替换链接中的部分字符串,可选值:1 | 0(0:否;1:是)
find_what:
replace_with:

🤠 记得看后面的注释说明,所需要的参数前面都提到了。需要注意的是 google_proxy 这个配置项,在本地推送 Hexo 更新的话需要代理,如果 Hexo 源代码托管在可以访问 Google 的集成部署平台(如:Travis CI、Vercel、Github Actions…)请将代理配置设为 0,并将部署命令由 hexo generate 改为 hexo generate && hexo deploy

如果按照上述步骤成功的话,那么在执行 hexo deploy 后,会得到类似下面的提示,那么恭喜你,配置完成啦~

1
2
3
4
5
6
7
8
9
10
11
12
13
14
15
16
17
18
19
20
21
22
23
24
25
26
27
28
29
30
31
32
33
34
35
36
37
38
39
40
41
42
43
44
45
46
47
48
49
50
51
52
53
54
55
56
57
58
59
60
61
62
63
64
65
66
67
68
69
70
71
72
73
74
75
76
77
78
79
80
81
82
83
84
85
86
87
88
89
90
91
92
93
94
95
96
97
98
99
100
101
102
103
104
105
106
107
108
109
110
111
112
113
114
115
116
117
118
119
120
121
122
123
124
125
INFO  Deploying: cjh_bing_url_submitter
INFO Deploy done: cjh_bing_url_submitter
INFO Deploying: cjh_baidu_url_submitter

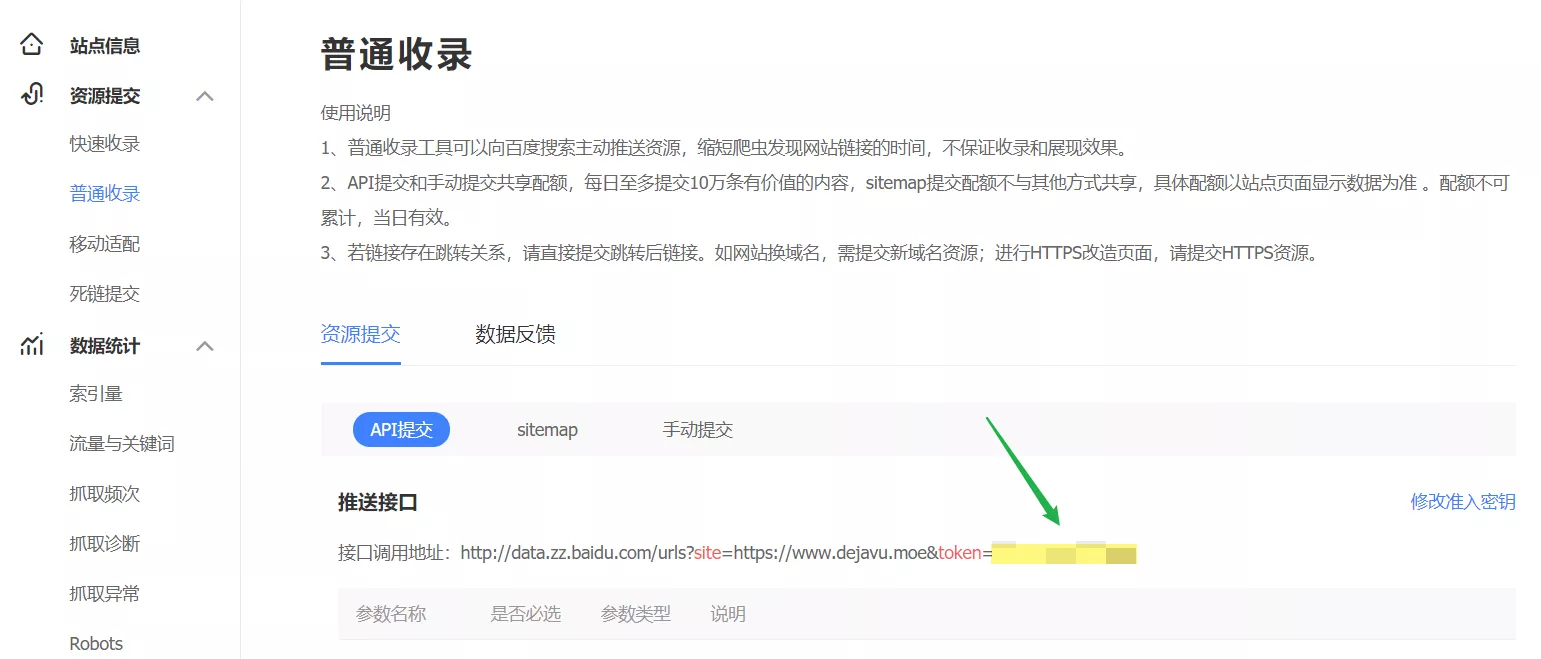
INFO Submitting baidu urls
https://www.dejavu.moe/posts/hexo-permalinks/
https://www.dejavu.moe/posts/hexo-seo/
https://www.dejavu.moe/posts/c-note-3/
https://www.dejavu.moe/posts/c-note-2/
https://www.dejavu.moe/posts/c-note-1/
https://www.dejavu.moe/posts/git-npm-yarn-proxy/
https://www.dejavu.moe/posts/hexo-next-beautify/
https://www.dejavu.moe/posts/hello-world/
Baidu response: {"remain":2992,"success":8}
INFO Deploy done: cjh_baidu_url_submitter
INFO Deploying: cjh_google_url_submitter
INFO Deploy done: cjh_google_url_submitter
INFO Submitting bing urls

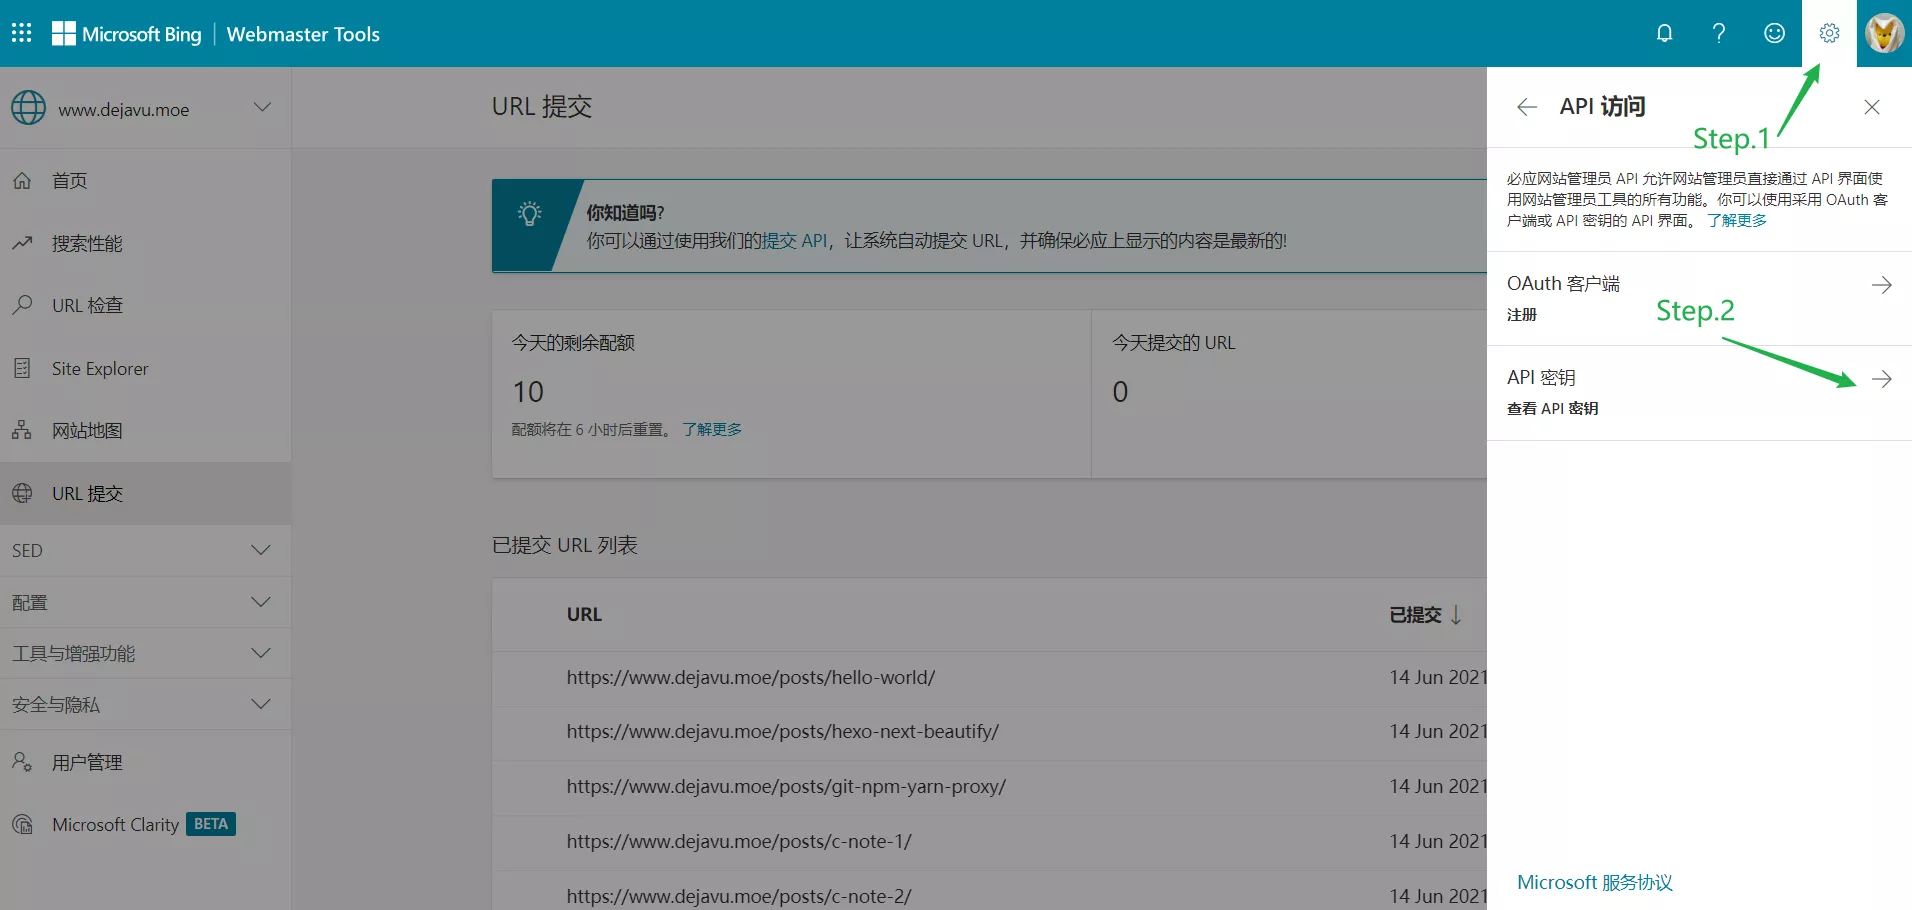
INFO Bing Submitting: https://www.dejavu.moe/posts/hexo-permalinks/
INFO Bing Submitting: https://www.dejavu.moe/posts/hexo-seo/
INFO Bing Submitting: https://www.dejavu.moe/posts/c-note-3/
INFO Bing Submitting: https://www.dejavu.moe/posts/c-note-2/
INFO Bing Submitting: https://www.dejavu.moe/posts/c-note-1/
INFO Bing Submitting: https://www.dejavu.moe/posts/git-npm-yarn-proxy/
INFO Bing Submitting: https://www.dejavu.moe/posts/hexo-next-beautify/
INFO Bing Submitting: https://www.dejavu.moe/posts/hello-world/
INFO Submitting google urls

INFO Google Submitting: https://www.dejavu.moe/posts/hexo-permalinks/
INFO Google Submitting: https://www.dejavu.moe/posts/hexo-seo/
INFO Google Submitting: https://www.dejavu.moe/posts/c-note-3/
INFO Google Submitting: https://www.dejavu.moe/posts/c-note-2/
INFO Google Submitting: https://www.dejavu.moe/posts/c-note-1/
INFO Google Submitting: https://www.dejavu.moe/posts/git-npm-yarn-proxy/
INFO Google Submitting: https://www.dejavu.moe/posts/hexo-next-beautify/
INFO Google Submitting: https://www.dejavu.moe/posts/hello-world/
Google response: {
urlNotificationMetadata: {
url: 'https://www.dejavu.moe/posts/hexo-seo/',
latestUpdate: {
url: 'https://www.dejavu.moe/posts/hexo-seo/',
type: 'URL_UPDATED',
notifyTime: '2021-06-16T18:59:29.204661533Z'
}
}
}
Google response: {
urlNotificationMetadata: {
url: 'https://www.dejavu.moe/posts/c-note-2/',
latestUpdate: {
url: 'https://www.dejavu.moe/posts/c-note-2/',
type: 'URL_UPDATED',
notifyTime: '2021-06-16T18:59:29.205195666Z'
}
}
}
Google response: {
urlNotificationMetadata: {
url: 'https://www.dejavu.moe/posts/hexo-permalinks/',
latestUpdate: {
url: 'https://www.dejavu.moe/posts/hexo-permalinks/',
type: 'URL_UPDATED',
notifyTime: '2021-06-16T18:59:29.291980560Z'
}
}
}
Google response: {
urlNotificationMetadata: {
url: 'https://www.dejavu.moe/posts/git-npm-yarn-proxy/',
latestUpdate: {
url: 'https://www.dejavu.moe/posts/git-npm-yarn-proxy/',
type: 'URL_UPDATED',
notifyTime: '2021-06-16T18:59:29.268035510Z'
}
}
}
Google response: {
urlNotificationMetadata: {
url: 'https://www.dejavu.moe/posts/hello-world/',
latestUpdate: {
url: 'https://www.dejavu.moe/posts/hello-world/',
type: 'URL_UPDATED',
notifyTime: '2021-06-16T18:59:29.285026675Z'
}
}
}
Google response: {
urlNotificationMetadata: {
url: 'https://www.dejavu.moe/posts/c-note-3/',
latestUpdate: {
url: 'https://www.dejavu.moe/posts/c-note-3/',
type: 'URL_UPDATED',
notifyTime: '2021-06-16T18:59:29.383086191Z'
}
}
}
Google response: {
urlNotificationMetadata: {
url: 'https://www.dejavu.moe/posts/hexo-next-beautify/',
latestUpdate: {
url: 'https://www.dejavu.moe/posts/hexo-next-beautify/',
type: 'URL_UPDATED',
notifyTime: '2021-06-16T18:59:29.357022535Z'
}
}
}
Google response: {
urlNotificationMetadata: {
url: 'https://www.dejavu.moe/posts/c-note-1/',
latestUpdate: {
url: 'https://www.dejavu.moe/posts/c-note-1/',
type: 'URL_UPDATED',
notifyTime: '2021-06-16T18:59:29.469752812Z'
}
}
}
Bing response: { d: null }

到此为止,关于 Hexo 的 SEO 优化套路就到此为止啦,以后就安心写作,等待被收录吧!收录速度个人感觉:必应 > 谷歌 > 百度
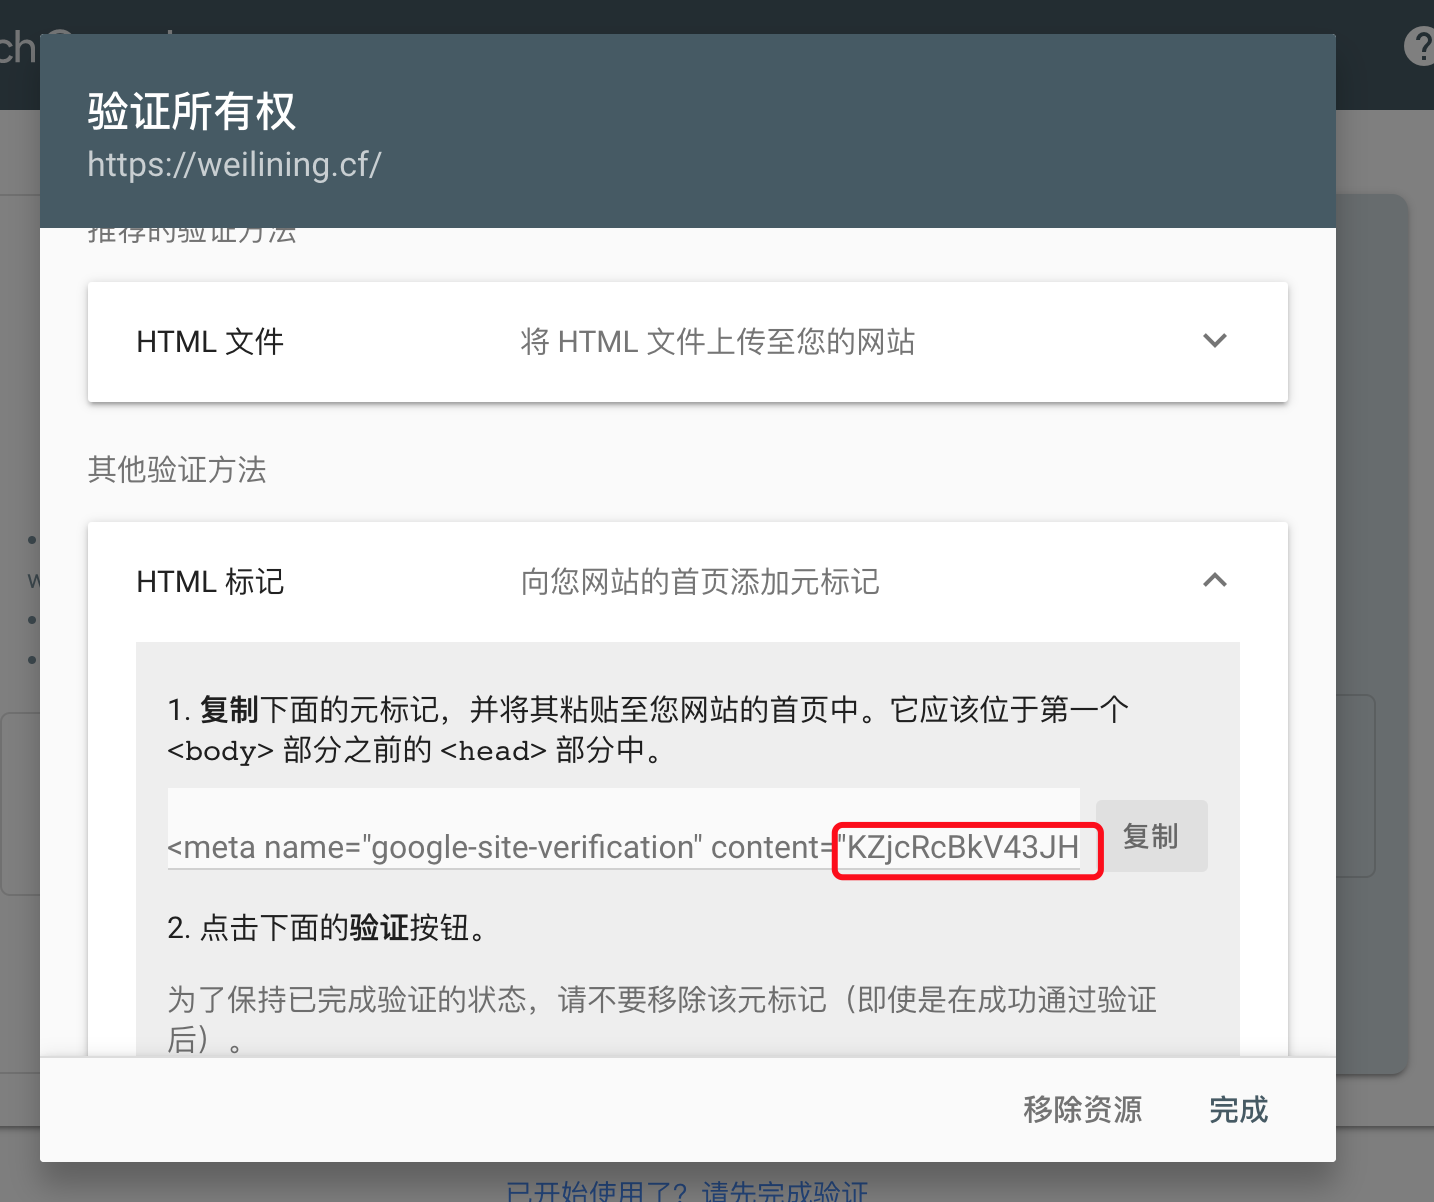
谷歌SEO

安装模块

1
2
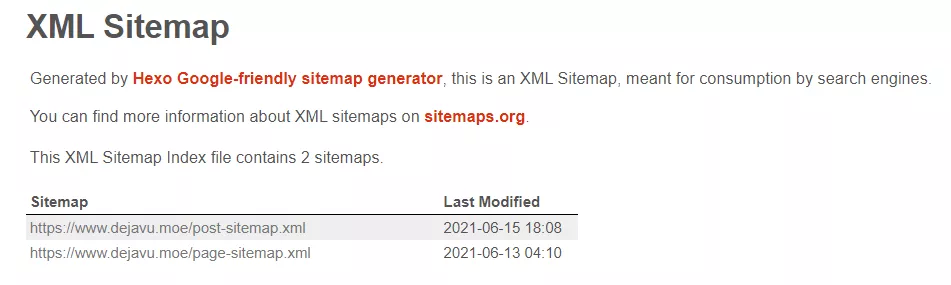
npm install hexo-generator-sitemap --save
npm ls --depth 0

配置

_config.yml

1
2
sitemap:
path: sitemap.xml

复制HTML标签验证代码

尝试使用 Google Search Console

image-20200920173748008

image-20200920173840032

加入代码

_config.next.yml

1
google_site_verification: KZjcRcBkV43JHcyiH4z1Yk2xu-mqlS1fQNk5Dzv7_q0

部署并完成验证

站点地图

填sitemap.xml,点击提交

image-20200922172549636

robots.txt

1
2
cd blog
vi ./source/robots.txt

填入以下代码

1
2
3
4
5
6
7
8
9
10
11
12
13
User-agent: *
Allow: /
Allow: /archives/
Allow: /tags/
Allow: /categories/
Allow: /about/

Disallow: /js/
Disallow: /css/
Disallow: /fonts/

Sitemap: https://weilining.github.io/sitemap.xml
Sitemap: https://weilining.github.io/baidusitemap.xml

https://www.google.com/webmasters/tools/robots-testing-tool

image-20200924034143894

查询是否生效

https://www.google.com/

输入

1
site:weilining.github.io

image-20200924151820077

完成

百度SEO

API推送

最为快速的提交方式,建议您将站点当天新产出链接立即通过此方式推送给百度,以保证新链接可以及时被百度收录。

使用API推送功能会达到怎样效果

及时发现:可以缩短百度爬虫发现您站点新链接的时间,使新发布的页面可以在第一时间被百度收录
保护原创:对于网站的最新原创内容,使用API推送功能可以快速通知到百度,使内容可以在转发之前被百度发现

Github

安装模块

1
npm install hexo-baidu-url-submit --save

配置

_config.yml

1
2
3
4
5
baidu_url_submit:
count: 5 ## 提交最新的五个链接
host: weilining.github.io ## 在百度站长平台中注册的域名
token: your_token ## 请注意这是您的秘钥, 所以请不要把博客源代码发布在公众仓库里!
path: baidu_urls.txt ## 文本文档的地址, 新链接会保存在此文本文档里

sitemap推送

sitemap:您可以定期将网站链接放到Sitemap中,然后将Sitemap提交给百度。百度会周期性的抓取检查您提交的Sitemap,对其中的链接进行处理,但收录速度慢于API推送。

安装模块

1
2
3
npm remove hexo-generator-baidu-sitemap
npm install hexo-generator-baidu-sitemap --save
npm ls --depth 0

配置

_config.yml

1
2
baidusitemap:
path: baidusitemap.xml

复制HTML标签验证代码

https://ziyuan.baidu.com/site

image-20200918233724766

加入代码

_config.next.yml

1
baidu_site_verification: code-wFDrn4lvkD

站点地图

1
2
3
npm uninstall hexo-generator-baidu-sitemap --save
npm install hexo-generator-baidu-sitemap@0.1.5 --save
npm ls --depth 0

查询收录结果

https://www.baidu.com/

输入

1
site:weilining.github.io

image-20200928141708262

完成

谷歌分析

Google Analytics

image-20200923163703719

image-20200923151226697

image-20200923151309532

配置

_config.next.yml

1
2
3
google_analytics:
tracking_id: G-10WB3QKEGC # <app_id>
only_pageview: false

网页速度测试

https://developers.google.com/speed/pagespeed/insights/

移动设备适合性测试

https://search.google.com/test/mobile-friendly

百度统计

  • 1、注册百度统计账号官网地址

  • 2、配置参数

  • A、获取baidu_analytics的key

配置

_confing.next.yml

1
baidu_analytics: fsfaf

查看

https://tongji.baidu.com/web/10000272406/overview

防止外链搜索(Next集成)

搜索引擎爬到你站点的外链多,会降低站点的PR值,也就是影响了你的排名,所以需要告诉爬虫哪些链接不要爬了。
原理就是在<a>里增加一个属性rel="external nofollow",这样爬虫就不会去爬这个链接。

若是你以前已经安装了 hexo-autonofollow,能够直接卸载 hexo-autonofollow 并安装 hexo-filter-nofollow。hexo-filter-nofollow 的配置和 hexo-autonofollow 的配置彻底兼容。

GitHub

安装模块

1
npm i hexo-filter-nofollow --save

配置

_confing.yml

1
2
3
4
5
6
nofollow:
enable: true
field: site
exclude:
- 'exclude1.com'
- 'exclude2.com'

Next防止外链搜索

配置

_config.next.yml

1
exturl: true

使用 curl 命令来模拟百度爬虫的请求

1
curl -A "Mozilla/5.0 (compatible; Baiduspider/2.0; +http://www.baidu.com/search/spider.html)" https://weilining.github.io/baidusitemap.xml