Gitlab基本管理
一. 创建Gitlab中第一个项目
1. Gitlab项目的可见类型有三种级别。
- Private project: 该级别是只有项目拥有者或者已经得到授权的人可以访问该项目,或者这些人是该项目组的成员。
- Internal project: 只要有用户名和密码,可以登陆该项目所在的Gitlab服务器的,均可访问该项目。
- public projects: 只要知道该项目的具体位置,就是路径,都可以访问该项目。它们默认的使用的是guest权限。
注意:可见的级别并不是和该项目的权限一一对应的。比如,可以访问Intelnal project,但并不意味着可以在该项目上进行删除、添加文件等操作。仅代表你可以刻隆该项目,查看问题等。
2. 改变可见级别步骤:
(1)进入项目视图
(2)点击编辑按钮
(3)改变可见级别选项。
3. 创建项目步骤

二. 在Unix、Linux系统上产生SSH key。
1. 实验环境:
主机名称: C7201 --------Gitlab服务器
C7202 ---------模拟Gitlab服务器客户端
2. 实验步骤:
(1)首先来检查一下是否已经存在ssh key。 执行以下命令来检查是否有文件id_rsa.pub或者id_dsa.pub.
ls ~/.ssh
(2) 执行以下命令来产生SSH-KEY文件。
[root@c7202 ~]# ssh-keygen -t rsa -C "Comment for key"
Generating public/private rsa key pair.
Enter file in which to save the key (/root/.ssh/id_rsa):
Created directory '/root/.ssh'.
Enter passphrase (empty for no passphrase):
Enter same passphrase again:
Your identification has been saved in /root/.ssh/id_rsa.
Your public key has been saved in /root/.ssh/id_rsa.pub.
The key fingerprint is:
SHA256:zihLgXaDZXunp3BJP7uWH+gep1s0fMEnZXV9dzDcqlM Comment for key
The key's randomart image is:
+---[RSA 2048]----+
| .=++|
| . o..B|
| o + ..+|
| = . . +E |
| + = o S + .o |
| . . = O o oo |
| + = O.+ . |
| . = +oB . |
| . .oB+. |
三. 在Windows 主机上产生SSH-Key文件。
(1)在以下网址进行下载https://git-scm.com/downloads,安装,具体步骤(略)。
(2)打开Git命令行窗口。

(3)执行以下命令产生SSH-KEY文件
$ ssh-keygen
Generating public/private rsa key pair.
Enter file in which to save the key (/c/Users/mike/.ssh/id_rsa):
Enter passphrase (empty for no passphrase):
Enter same passphrase again:
Your identification has been saved in /c/Users/mike/.ssh/id_rsa.
Your public key has been saved in /c/Users/mike/.ssh/id_rsa.pub.
The key fingerprint is:
SHA256:us30pESKeTghRu8MfEMnX+WZJ4M+FjA5sqNrWuIKKIA mike@win10-001
The key's randomart image is:
+---[RSA 2048]----+
| o. . |
| . oo + o |
| . oo..+ * . |
|.o oo+ o . + |
|E =.=.. S |
|o..* * = . |
|= ..B + o . |
|+oo o * + |
|++ . + . |
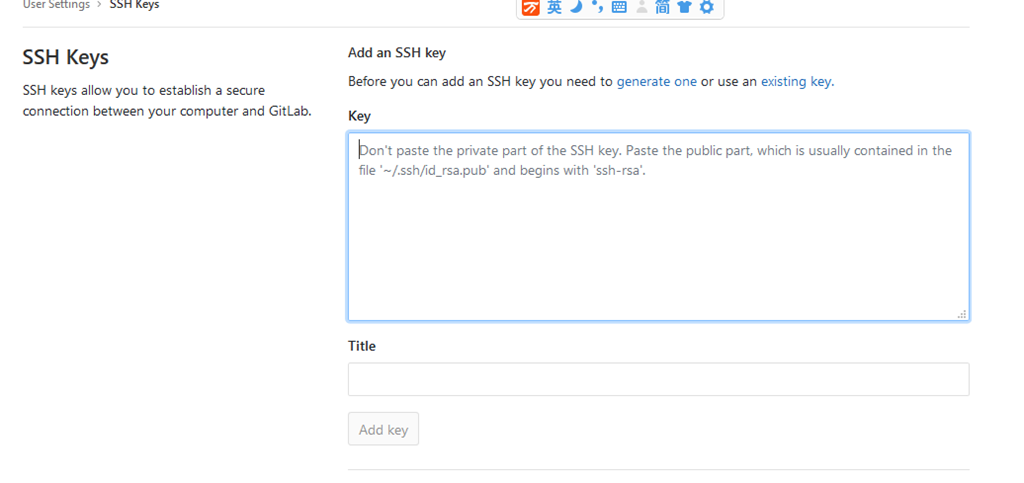
四. 添加SSH key文件到Gitlab服务器
(1)找到如下位置。

(2)把我们第二步或者第三步产生的密钥公钥放在此处。
LINUX上查看公钥内容:
[root@c7202 ~]# cat ~/.ssh/id_rsa.pub
ssh-rsa AAAAB3NzaC1yc2EAAAADAQABAAABAQCugkcsdX4qe4cc5HjryGY7judYrqV4B688z3As1NYE/Pbn/RjFRmCzgKSzWRp7EN3SSMoN5yfdq84DUJ3lzzUC0k6+x7lL8Ma3uNMbpzLwdfGLWjMo0wB6ZIBuNEEgyfrfOg1xI9MWhaZKRlEKAW8ibhrx5GPojWbZHPDxy1y9a8Qsnufkqu1NgM9vnu8y2NWqFXGrZwbl8LAsCGwYr9JIqR5DJNklnNV5oWCZpdVtjeRljUPlPmF7d6+k7mrEdxIdhr7vtM6d1G1wBVqYv7DpMBZGy49xBT+V3fM66lOMO0wfTM4gTQQDvysWtchv2RzP1ViYuSrI94851OENxd2r Comment for key
WINDOWS 查看公钥内容:
$ cat id_rsa.pub
ssh-rsa AAAAB3NzaC1yc2EAAAADAQABAAABAQC4xHkRoc9QuEwdojNtB7Q1yRVF2PxsHeNdfAuMKnl2mqxoFKE3XXvKMyAm6ZKWxMeeuVB81lVB0xqkUKfOCCioMF/dtSglpnCWW4sxWVPSRPLD5NbY3Em3By7a/QuaYwe1O32kD6QdlPZrBuddbCh1gbUw5F46ta1X2qD3QWRC0J1ohv0SzH96b3U3bxyl/foCarLl7ZWIhe27+n/JX6KPDi/Hnmp7+Tz2w9wbnbcY31TDVgz9gg1d8UrO0ARramW+Ba5d4SPeV5z8HJwttxUjtf8HNBwKWZUgXOrUsMmj/+ZI5oYge3U2YWGUdqJxFcZRwOB/Lrhf4h6XBguv7cg1 mike@win10-001
五. 在本地创建第一个git 项目。
(1)打开windows下git的窗口终端或者LINUX下的终端。
(2)创建一个super-git文件夹,然后切换到该文件夹。
mike@win10-001 MINGW64 ~
$ mkdir super-gitmike@win10-001 MINGW64 ~
$ cd super-git/
(3)使该文件夹作为Git项目 ,需要告诉Git去监控该文件夹。执行以下命令。
$ git init
Initialized empty Git repository in C:/Users/mike/super-git/.git/
(4)创建一个文件并把它添加到库中,该文件名字命名为README.md
mike@win10-001 MINGW64 ~/super-git (master)
$ echo "HELLO README" > README.md
(5)添加新文件到Git,执行以下命令。
$ git add README.md
(6)提交文件到本地库。
mike@win10-001 MINGW64 ~/super-git (master)
$ git commit -m "Our first commit"
[master (root-commit) d6c9c4a] Our first commit
1 file changed, 1 insertion(+)
create mode 100644 README.md
六. 刻隆仓库和推送代码到仓库
(1)找到想要刻隆仓库的地址,样式如下:
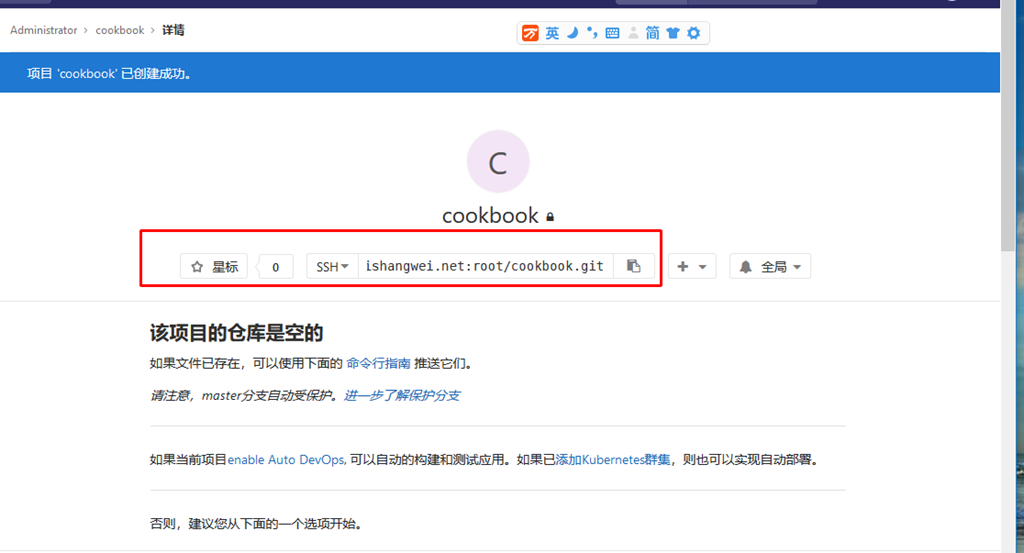
(2)使用以下命令进行刻隆。
mike@win10-001 MINGW64 ~/cookbook
$ git clone git@gitlab.aishangwei.net:root/cookbook.git
Cloning into 'cookbook'...
The authenticity of host 'gitlab.aishangwei.net (192.168.2.201)' can't be established.
ECDSA key fingerprint is SHA256:HvXTteW8UQ0MtxDAlMhL9XNOElAVV69d8nDsWjixrXI.
Are you sure you want to continue connecting (yes/no)? yes
Warning: Permanently added 'gitlab.aishangwei.net,192.168.2.201' (ECDSA) to the list of known hosts.
warning: You appear to have cloned an empty repository.
(3)进入我们刻隆的文件夹,可以通过以下命令查看是否是GIT文件夹。
$ git status
On branch masterNo commits yet
nothing to commit (create/copy files and use "git add" to track)
(4)创建一个文件。
mike@win10-001 MINGW64 ~/cookbook/cookbook (master)
$ echo "Hello Gitlab" >> README.md
(5)添加这个文件到stage状态。
mike@win10-001 MINGW64 ~/cookbook/cookbook (master)
$ git add README.md
warning: LF will be replaced by CRLF in README.md.
The file will have its original line endings in your working directory.
(6)执行以下命令,提交这个改变。
mike@win10-001 MINGW64 ~/cookbook/cookbook (master)
$ git commit -m "Added readme file"
[master (root-commit) 53ec2ca] Added readme file
1 file changed, 1 insertion(+)
create mode 100644 README.md
(7)把该文件推送到gitlab服务器上。
mike@win10-001 MINGW64 ~/cookbook/cookbook (master)
$ git push -u origin master
Counting objects: 3, done.
Writing objects: 100% (3/3), 225 bytes | 112.00 KiB/s, done.
Total 3 (delta 0), reused 0 (delta 0)
To gitlab.aishangwei.net:root/cookbook.git
* [new branch] master -> master
Branch 'master' set up to track remote branch 'master' from 'origin'.
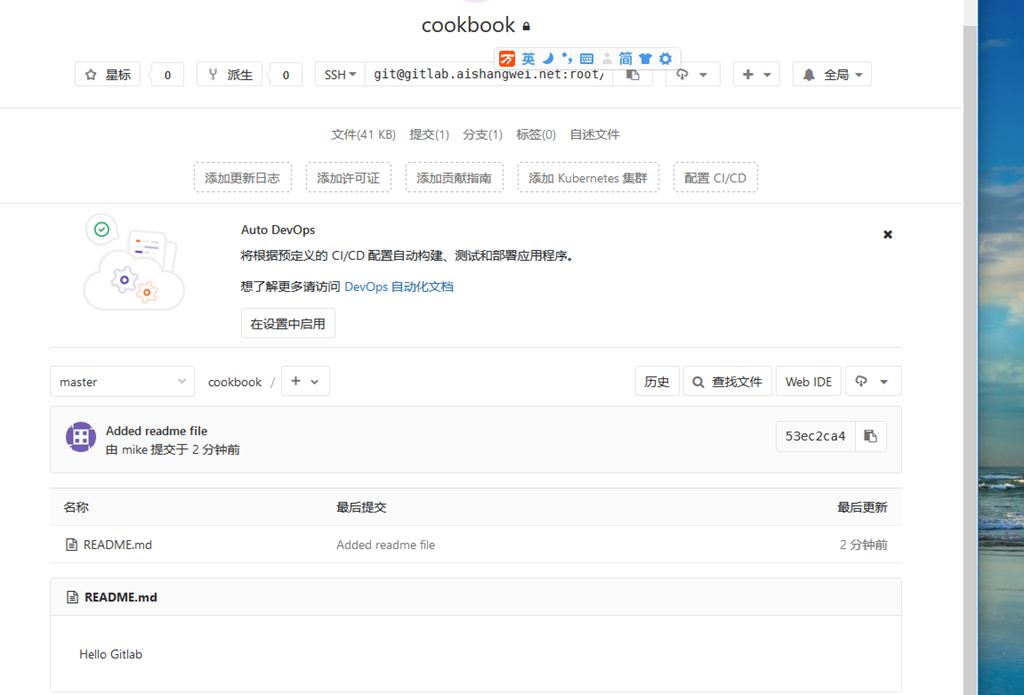
(8) 在Gitlab服务器上查看信息如下:
Talent without working hard is nothing.
一. Gitlab分支
1. 切换到项目位置。
2. 创建一个项目的一新分支。
mike@win10-001 MINGW64 ~/cookbook/cookbook (master)
$ git branch first-branch
3. 切换到新建的分支下。
mike@win10-001 MINGW64 ~/cookbook/cookbook (master)
$ git checkout first-branch
Switched to branch 'first-branch'mike@win10-001 MINGW64 ~/cookbook/cookbook (first-branch)
4. 第2步和第3步可以合并成一步。
mike@win10-001 MINGW64 ~/cookbook/cookbook (first-branch)
$ git checkout -b first-branch
5. 改变文件的内容。
mike@win10-001 MINGW64 ~/cookbook/cookbook (first-branch)
$ echo "Change" >> README.md
6. 提交这个改变
$ git commit -a -m 'Readme changed'
warning: LF will be replaced by CRLF in README.md.
The file will have its original line endings in your working directory.
[first-branch dc7b6d5] Readme changed
1 file changed, 1 insertion(+)
7. 推送分支到gitlab服务器
mike@win10-001 MINGW64 ~/cookbook/cookbook (first-branch)
$ git push -u origin first-branch
Counting objects: 3, done.
Writing objects: 100% (3/3), 262 bytes | 131.00 KiB/s, done.
Total 3 (delta 0), reused 0 (delta 0)
remote:
remote: To create a merge request for first-branch, visit:
remote: http://gitlab.aishangwei.net/root/cookbook/merge_requests/new?merge_request%5Bsource_branch%5D=first-branch
remote:
To gitlab.aishangwei.net:root/cookbook.git
* [new branch] first-branch -> first-branch
Branch 'first-branch' set up to track remote branch 'first-branch' from 'origin'.
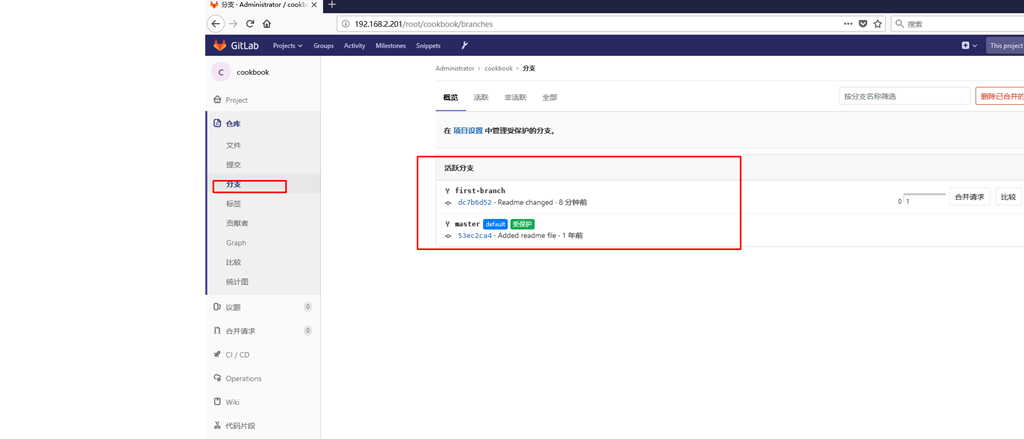
8. 在Gitlab服务器查看我们推送的分支
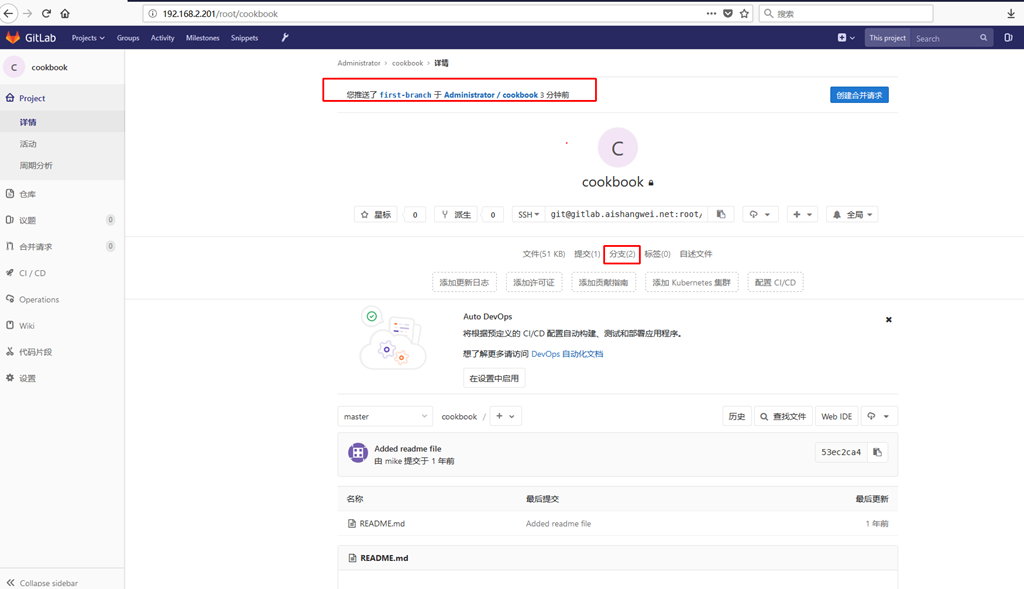
9. 从以下图可以看到创建的分支first-branch和master分支。
10. 切换到master分支。
$ git checkout master
Switched to branch 'master'
Your branch is up to date with 'origin/master'.
11. 合并first-branch分支到master分支。
$ git merge first-branch –no-ff
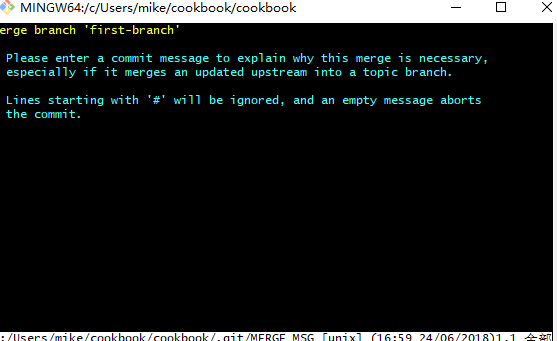
12. 从第11步输出的信息可以看到,给我们一个机会去改变提交的信息。在我们保存和关闭编辑器的时候,这个分支将会合并,具体信息如下.
mike@win10-001 MINGW64 ~/cookbook/cookbook (master)
$ git merge first-branch --no-ff
Merge made by the 'recursive' strategy.
README.md | 1 +
1 file changed, 1 insertion(+)
13. 推送改变到Gitlab上的master.
mike@win10-001 MINGW64 ~/cookbook/cookbook (master)
$ git push origin master
Counting objects: 1, done.
Writing objects: 100% (1/1), 223 bytes | 223.00 KiB/s, done.
Total 1 (delta 0), reused 0 (delta 0)
To gitlab.aishangwei.net:root/cookbook.git
53ec2ca..5e1ebdd master –> master
14. 删除所创建的分支。
mike@win10-001 MINGW64 ~/cookbook/cookbook (master)
$ git push origin --delete first-branch
To gitlab.aishangwei.net:root/cookbook.git
- [deleted] first-branch
15. 在gitlab服务器上查看信息如下。

二. 执行rebase操作
当我们长时间的运行在分支上的话,我们有时想要同步master,可以通过合并到master后,再切换到我们所在的分支,Git有一个更好的方式来这个,叫做rebasing。 在rebasing中,相当于把你当前的branch分支合并到master,并同步master状态。不过是一步完成了。
1. 使用终端进入到cookbook项目,并创建一个分支。
mike@win10-001 MINGW64 ~/cookbook/cookbook (master)
$ git checkout -b rebase-branch
Switched to a new branch 'rebase-branch'
2. 创建一个新的文件并提交它。
mike@win10-001 MINGW64 ~/cookbook/cookbook (rebase-branch)
$ echo "File content" >> another_file.mdmike@win10-001 MINGW64 ~/cookbook/cookbook (rebase-branch)
$ git add .
warning: LF will be replaced by CRLF in another_file.md.
The file will have its original line endings in your working directory.mike@win10-001 MINGW64 ~/cookbook/cookbook (rebase-branch)
$ git commit -m 'Another commit'
[rebase-branch c20f042] Another commit
1 file changed, 1 insertion(+)
create mode 100644 another_file.md
3. 切换到master分支。
mike@win10-001 MINGW64 ~/cookbook/cookbook (rebase-branch)
$ git checkout master
Switched to branch 'master'
Your branch is up to date with 'origin/master'.
4. 假如先前推送过代码分支到Gitlab服务器,再执行rebase,那么在推送时候,可能服务器会报错。为了克服这个问题,可以使用-f参数。
1 |
5. 在master分支上创建提交。
mike@win10-001 MINGW64 ~/cookbook/cookbook (master)
$ echo "1" >> README.mdmike@win10-001 MINGW64 ~/cookbook/cookbook (master)
$ git add .
warning: LF will be replaced by CRLF in README.md.
The file will have its original line endings in your working directory.mike@win10-001 MINGW64 ~/cookbook/cookbook (master)
$ git commit -m 'Commit in master'
[master acb491e] Commit in master
1 file changed, 1 insertion(+)
6. 切换到rebase-branch 分支
mike@win10-001 MINGW64 ~/cookbook/cookbook (rebase-branch)
$ git rebase master
First, rewinding head to replay your work on top of it...
Applying: Another commit
三. 挤压提交信息(Squashing your commits)
在开发的时候可能由于频繁的提交信息,比较零散和片断,比如在提交多少次后,想做一个总结。这时候可以把前面几个合并成一个提交信息。
执行案例:
1. 进入到cookbook项目,并切换到squash-branch分支。
mike@win10-001 MINGW64 ~/cookbook/cookbook (rebase-branch)
$ git checkout -b squash-branch
Switched to a new branch 'squash-branch'
2. 在squash-branch分支下创建两个提交 ,并把它两个提交挤压到一起。
mike@win10-001 MINGW64 ~/cookbook/cookbook (squash-branch)
$ echo "1" >> README.mdmike@win10-001 MINGW64 ~/cookbook/cookbook (squash-branch)
$ git add .
warning: LF will be replaced by CRLF in README.md.
The file will have its original line endings in your working directory.mike@win10-001 MINGW64 ~/cookbook/cookbook (squash-branch)
$ git commit -a -m 'wip1'
[squash-branch 4e54db8] wip1
1 file changed, 1 insertion(+)mike@win10-001 MINGW64 ~/cookbook/cookbook (squash-branch)
$ echo "2" >> README.mdmike@win10-001 MINGW64 ~/cookbook/cookbook (squash-branch)
$ git add .
warning: LF will be replaced by CRLF in README.md.
The file will have its original line endings in your working directory.mike@win10-001 MINGW64 ~/cookbook/cookbook (squash-branch)
$ git commit -a -m 'wip2'
[squash-branch 5d37a65] wip2
1 file changed, 1 insertion(+)
3. 通过以下命令可以查看我们的提交历史。
mike@win10-001 MINGW64 ~/cookbook/cookbook (squash-branch)
$ git log --oneline
5d37a65 (HEAD -> squash-branch) wip2
4e54db8 wip1
f5f7fde (rebase-branch) Another commit
acb491e (master) Commit in master
5e1ebdd (origin/master) Merge branch 'first-branch'
dc7b6d5 (first-branch) Readme changed
53ec2ca Added readme file
4. 把wip1和wip2的提交信息挤压在一个更好的提交信息中,执行以下命令。此时会打开一个编辑器。
$ git rebase –i HEAD~2
注解: HEAD2 代表着我们想挤压最后两个提交。假如你想要挤压最后4个提交,那么使用HEAD4
原始:
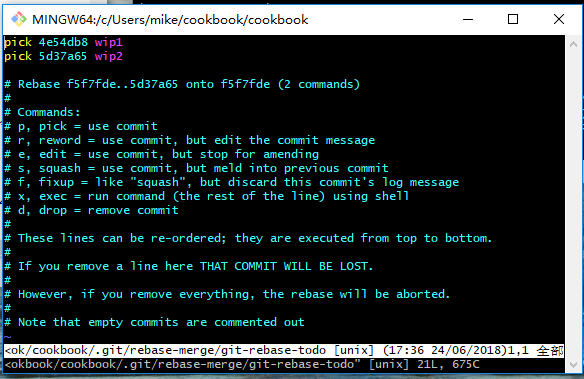
改变后:

5. 第4步编辑保存后,Git会打开另外一个编辑窗口,在这个窗口中,编辑提交信息并保存。会弹出如下画面。
$ git rebase -i HEAD~2
[detached HEAD 48f7dae] Added two number to the readme
Date: Sun Jun 24 17:33:08 2018 +0800
1 file changed, 2 insertions(+)
Successfully rebased and updated refs/heads/squash-branch.
6. push该分支到gitlab服务器。
$ git push origin squash-branch
Counting objects: 9, done.
Delta compression using up to 4 threads.
Compressing objects: 100% (5/5), done.
Writing objects: 100% (9/9), 839 bytes | 104.00 KiB/s, done.
Total 9 (delta 0), reused 0 (delta 0)
remote:
remote: To create a merge request for squash-branch, visit:
remote: http://gitlab.aishangwei.net/root/cookbook/merge_requests/new?merge_request%5Bsource_branch%5D=squash-branch
remote:
To gitlab.aishangwei.net:root/cookbook.git
* [new branch] squash-branch -> squash-branch
Talent without working hard is nothing.